Thursday, October 22, 2015

Mountain art journal used to inspire new felt piece

With mountains being a recurring theme for me lately, I started a new art journal.       I was playing with spray inks and made masks with torn paper or deli wrap.    I used them but could not throw them away.  

So, into the mountain journal they go.  And the gelli prints too.      And now I'm looking around things I've done in the past that would fit the theme and will add them in.      


One of the reasons many of us keep art journals is to find inspiration from things we m ight otherwise have tossed away.     Like these mountains.    I probably will add text later with quotes and poetry. 


this last pic has copies of two watercolored woodsy scenes I painted years ago.  I'm going to use them for inspiration for the next felted piece I do.
   

Felt piece finished.


It took quite a while to call this finished.   Perhaps because it needed more tweaking, or perhaps I just loved the process of the fine layering of colored wools and the act of punching it with the barbed needle.      It's ready to enter in  the small works show.       And I'm ready to move on to the next one.

Clown alert! Another scary post card

I know some of you freak out over pictures of clowns.   Well, don't peek then.    BTW he is not vicious, he's profoundly sad.    


Boo.

It's time to get scary stuff out in the mail or to display.      Here are a some post cards I made years ago.    These are altered photos from a book.     I think they have a story to tell.        I d on't know what it is, but I like to ponder.....   I think I've shown them here before, but why not again?    


Tuesday, October 20, 2015

Boiled books part 3

These colorful leaves from the senior center seem like likely candidates for experimenting with the boiled books.

 This time I skipped the tiles and used only clips.
Ater boiling, I found the color of the paper to have hardly changed and the water in the pot was not black.    So, I began to wonder if the leaves had left any impressions.  

A quick peek let me see a faint outline, so  I used some Iced Spruce color distress ink spray on the edges of the soaking wet paper and let them sit awhile still clamped together.  When I opened the packet this is how they looked.   Distress inks are so reactive with water it spread all through the packet.

The second packet I returned to the pot and poured in more of the distress ink right into the pot and let it boil for another 20 minutes.      When I removed them, of course the water was now darkened more, and so was the paper. 
I set this packet on a tile and let it sit overnight with a stone on top to keep the pressure on the leaves. 
This is how they looked when I peeled them open.   You can see most of the color is gone from the leaves, but hardly any migrated to the paper.   


Saturday, October 17, 2015

boiled books part 2


 Here we go again.     Taking the boiled book package out of the pot.   Can hardly wait to see what's inside but waited to let it cool and sit overnight.


 Look how black the water in the pot turned.    Perhaps because I used some leaves from black oak tree?


Here is a packet, note the wires are now rusted.   Hmmm...  hadn't thought of that.   
 What I'm doing is opening the booklets, page by page.  They started with the fresh leaves and plant debris inside but now are soft and flattened against the pages.  Soem of those little dark splotches were small red rose petals.  They did not leave any color as I expected.
 this is the page with the plant materials removed.
 Here is a page with the imprint on opposite page.
 Another one with imprint on opposite page, birch trees give off the yellow cast.   
 Geranium leaf imprint on opposite page.    Of course on the page under the leaf there is also a lot of color transfers and will be shown later.
 Here is a layerd page, with an iris sword, oak leaf and birch leaves over the top. 
 this is the opposite page.
this is the 2 page spread after leaves are removed.


 Finely cut Japanese maple leaf.
 Leaf removed.


 Dried iris leaf. rosemary, thyme.   Showing opposite page.
 With leaves removed.
 Bay leaf, rosemary, black oak leaf stem from garlic chive. showing opposite page.
 stringy stuff was from an old sisal planter liner.  Just curious what it might do.   
 Leaf assortment showing opposite page.
 Same spread with all leaves removed.
Instead of stuffing the pages with leaves, I thought I'd try a subtle piece.    I think this is from heavenly bamboo.   shows on opposite page as well.


 I turned back the bottom page which had been pressed up against the back of a ceramic tile with grooves on it.     Black oak leaves. Tile pattern looks like shutters.   
shown with plant material removed.


I expect these will dry lighter.   Will know later.

I'm pressing some of these cooked leaves.  Not sure how that can work with boiled leaves, but worth a try.   Would like to use some in the books.

These photos are from one of the two packets.   The other one I opened in the studio last night.   I'll show pics from that in next post.     I wanted to see if it made a difference to leave things stacked overnight.     I'll know later.  I guess I should let them all dry before comparing.       


Friday, October 16, 2015

Boiled Books

The frenzy is on.   Started by online art  pals who brought this to my attention.     It wasn't the process that lured me in, but the wonderful organic look of the paper after the process is complete.      It's a project that I didn't need to go look for materilas other than in m y kitchen, studio and garden. 


The first three photos are from the first batch I made.   I think they turned grey because I tossed in what I thought was a rusty little tin thing - but now I think it was a faux rust finish.   So, the finish stained the paper.   I like it fine tough, it's subtle at least. 


Basically, it's using watercolor paper, leaves from the garden, a big art-dedicated pot water and vinegar.   Oh yes, a couple of ceramic tiles and a rock.    

Here is the link where I learned to do this.  Of course I varied it up a bit.    LOL     https://www.youtube.com/watch?v=ULFIuj1euQ0


First I folded and tore the paper to sized to make little books the size of the tiles. 


 I have some good smelling things in my little garden.  Rosermay, Bay leaves, sage, thyme.   It will smell better than the last batch which was mostly oak and birch leaves.   

I gathered leaves and stems and arranged them in the books, sort of stuffing them pretty full in most places. 


According to people who know, you put a tile down and start bulding your book on top of it, by adding the greenery and twigs and leaves between the pages of the folded books stacking them together if small.


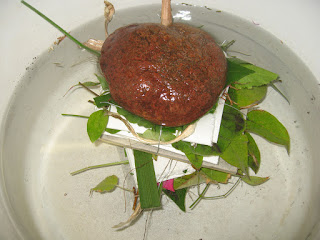
Next step is to position the upper tile on it and clip them together with clamps or such.  Not having a ready supply of clips, I opted to wire mine together as snugly as I could.  


The bundled stacks now go into a big pot of water, with
about 3/4 cup white vinegar.     Just to hold mind down better, I added a rock on top.  But figure once it starts bubbling away, boiling for 1 1/2 hours, it's likely going to topple off - and sure enought I just heard it do just that.     Oh well, I"m sure they'll  do fine anyhow.    

I'll post pics tomorrow.   The first batch I did two days ago, I left overnight in the bundles rather than open them right away.  I thought the colors might get more intense with longer exposure to the leaves.

You might want to try this before all the leaves fall.   Fall is here and they are starting to turn now.