
Wednesday, September 23, 2015
Book Murals
Saw this on the web and had to share. http://www.creativeboom.com/art/hundreds-of-vintage-books-transformed-into-giant-mural-illustrations/
Monday, September 21, 2015
KVIE Art Auction
 This past weekend was the annual KVIE Arrt Auction. Artists donate their art for the auction and the sales go to the public television channel. It's a good cause. Lodi Art Center had about 20 minutes to present the works of 6 of our artists whose works had been accepted for the auction. My friend Jean was one of them. We had a little get together at her house to watch. Here is Jean next to her Yupo watercolor of koi.
 She received a phone call from them in the evening. They told her it sold for well over her estimated price. Win, win. Made everyone happy.

GOT PURPLE?
 I received my new order of dyed wool roving. While sitting at the gallery yesterday with Jean, I worked on adding some of the new colors onto the felted piece. I have much better greens to work with, certainly moe like the tree colors I know, kind of olive greens. Then the purple had to be worked into the hilside for an extra punch of color. Here's the way it looks this morning. Maybe by evening it will change.
My friend Vivian and I were talking about the wook, and it occured to me that it's title might be........ "A Roving".
The second photo is what it looks like on the back when I peel it off the dense foam. I actually like it a lot. Not all of the colors have come through yet, but more will as it progresses. The amount of wool that comes through is so much thicket than with the old green foam pad I used to use.
Photoshop elements play time

I hope you can see the differences.
These are single manipulations. You csn always do one filter, then do another with the ressulting image, and then another and another. There's no limit. You can leven layer them. But for this little play session I wanted to make a sample sheet with individual techniques to share with my mixed media group.
Photoshop elements is one of the tools I sometimes use when planning out a piece of art. I do some of the trials here, like adjusting colors, or heightening the sauration of colors. I seldom opt for bright colors in my works, but in Photoshop I can do it and like it on screen. Its a play place.
Loads of tutorials are available online, and there are many good books on using computers in your art arsenal - or even to create digital art. Have some digital fun.
I posted this and then went to look at it. Photos are so small they don't show well, so I'll add a few larger ones here.

This was the original

Crinkled.


Saturday, September 19, 2015
Colorful felted landscape a work in progress

I ordered a larger high density foam pad from Amazon and when it arrived I couldn't wait to try it. Wow. What a difference it makes. My old foam pad had been punctured so many times, it was losing it's shape. this is firm and takes far fewer strokes with the multineedle punch to grip the backing. I use a piece of felt cut to the size I want my finished piece for a backing. I had to cut the pad to a more manageable size to carry with me, but I have lots left over for larger works.
This is the one I'm working on now. When I peeled it off the foam, I was amazed how much more wool works it's way through the felt. More than double the amount than the softer green foam. Not sure if that's good or bad. I did find it really difficult to remove it from the foam backing as it really stuck with the fibers worked into the dense foam.
For laying out a piece, I just draped fibers across where I thought I wanted them and then tacked them down quickly with the multi needle tool (mine has five needles). Right away I could feel the difference, in fact it was so fast and easy I thought it might not be as satisfying an activity because it was too fast. Less meditative, if you know what I mean. If you felt, you will know.

Since I took this a couple days ago, I've made a lot of changes. I also ordered some new colors from Ebay, so am waiting for new greens and salmon colors, even some purples. Who knows what they may look like next time you see it. It's definitely a work in progress.
This is one of the things I've been working on while the roofers are overhead. It's Saturday today and they won't be around again until Monday. It is so nice to have it quiet. And peaceful. Just like a little landscape.
This will go in my series, Peaceful Places.
Gelli printing, minis
 Since I want to enter something in the itty bitty mini art show (max size 3 x 3 inches) which is up in November and December at the gallery, I decided to print miniature gelli prints.
 These are abstract landxcapes in my favorite palette. Asphaltum, black and white. My smallest gelli plate is 3 x 5, so it was easy to mask it off to the right size. I just turned one of my business cards over on the top of the plate. Then it was just a matter of playing with my brayers and wide brush and paints, and pull one after another onto either copy paper or deli wrap.
 I will do this again with better quality paper, but this experiment proves that it can be done and individually they are quite nice. Not sure how I will mount or frame then yet, but that's just another challenge ahead.
This was so much fun.
Most people who use the gelli plate use it with lots of colors, stencils, etc. They are amazing. Check you tube for all kinds of tutorials. Of course you can do monoprinting on lots of other surfaces.
I was looking at a foam kneeling pad when I was gardening last evening, and thought - hmmmm... this would make a good printing plate. hmmm...
I'm keeping the gelli plates in the house. I don't think it's healthy for them to be subjected to the temperature variations in the studio. And they are not cheap. I'd hate to have them damaged. But the kneeling pad could stay int he studio. Or some of the other pads for the kitchen that people are using.
Tapping on your brain

Wednesday, September 16, 2015
Gelli monoprints
Here are pics of the monoprints done on gelli plate.
 I tried the pears first without black borders but didn't like them, so took some black acrylic paint, diluted with a little Golden retarder that keeps it open and more fluid.
I'm using Winsor Newton Galeria acrylic titanium white, it's smooth as silk. Most of the colors are Liquitex Basics. At first I liked these a lot, but they do not like heat. My studio must have cooked them or something because they no longer are smooth and creamy. Some are barely usable, and I'm not happy with them. I won't buy them again. They also clog up the opening - I d rather be using craft paints that hold up for decades. I like having them in the tubes, and they are hot on the market, so I had to try them out. I guess if temperature was not an issue, I would still like them.
I think I'll be using my discount coupons to buy more of the Winsor Newtons when I need them. They are my number one favorites.
I have a few tubes of Acrylics by Art Insitute given to me by a friend. I think they are quite nice so far and will use them again today for a better trial.
 As I'm working inside I don't have much space to set things to dry. I can't put them outside as the roofers are still stirring up the sawdust and tiles debris. So they are all over my living space including the kitchen counter and stove. LOL Any bare space that the dogs can't jump on! Three more days of this.
 Tuesday, September 15, 2015
gelli prints
 Wtih this week being devoted to staying around while new roof is installed, I decided it would be fun today to play with gelli plates.
 Here is one little group os things. First pull was just the blues for a background.
 The plate was nearly dry and there was a lot of paint left, so I painted over it with some yellow and white and brayered it down again. While it was wet I dragged the end of my paint brush through to make simple designs of faces, then pulled another print. This time it picked up the lower level of the blue for the lines.
Third pull brought up the rest of the blues and whatever wax dried on the plate previously, and left the lines white, as that paint was pulled up in the previous pull.
T
Monday, September 14, 2015
Feeling like felting
I need to carry supplies to the senior centers for art days, Monday mornings at Oak Park, and Wednesdays at Arnold Rue Center. Some of the artists that paint in oils carry all kinds of stuff with them, at least a big cart and wet canvases. Smelly wet stuff. I am just to lazy to cart things, so I either take my sketch book, an art journal, or m ore recently I've been carrying my little tote with my fibers, needles and foam. That's all it requires. I feel like felting.

This piece I started quite a while ago, in fact it's the first felted landscape I tried. I planned to enter it in the "itty bitty artworks" show in Nov. But, I didn't know they would set the size at 3 x 3 max. This measures 3 x 4 inches. Just oversize. It can go in the small works show, but I want to enter the seascape in that one. Small works can be up to 8 x 10 or 6 x 12. I'm well under the size limits. They do not count the framing.
Here is the first seascape I did. I started with the clouds drifing off horizontally and it just didn't look good, so I picked it out fiber by fiber and changes them to radiate out at angles as in a photo I took years ago at the beach.

The last photo is the one I'm working on presently. It is sitting on the foam block I use to punch into with the long needles. People are always popping in and out of the art room to see what we are doing. No one has ever seen anyone felt before, so it's a treat to be able to show them and let them try it. I should prepare a little handout to tell them where they can get supplies, because I think some of them would really enjoy this art activity.

Monday, September 7, 2015
What can be done with the new inks?
These are all experiments with the Dylusions Spray Inks, and the Tim Holtz Distress stains and inks and water. Then a few touches now and then with the white paint pen by Sharpie.
I'm doing the 30 day chllenge so it seems a good time to experiment. Mostly I'm trying to see if these paints, although not created for fine art applications, and I have no idea how color fast they will prove to be - can be used in a painterly way. Most people are using these in art journals and in paper arts applications. They are fabulous for those. The Dylusion sprays are so bright and vivid, I'm finding for my taste, I'm having to dilute them down with water to get the intensity more measured. The Distress inks can give interesting effects with water sprays and drops Wear gloves when you work with the Dyluion inks. Found this out the hard way.
Here are some of the samples I'd done. Mostly you'll see I'm into landscapes right now. Meadows, waterfalls, mountains, water. The basics.

There are green colors here, such as Dirty Martini, Mowed Grass, Bundle of Spruce, Dark Olive. I need to make myself a new color chart with the new colors.


 The last three are all with the Distress inks and walnut inks. Faded Jeans for the blue, sometimes diluted with water. Walnut ink in the Eucalypus color is kind of a soft grey with a mere hint of green. Faded linen is the softer beige tones. This grey purple color ( I'll edit the name in later) is an interesting color. When it is applied with the sprayer, it looks grey but as it dries it gets the purple cast. I was not expecting that.
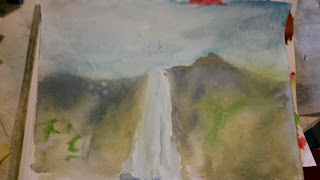 I'm dabbing out some of the blue in the sky with a tissue. One of the distress staians is white, the Picket Fence. I have it in the dauber and used it randomly on the sky before spraying the blue. Not very successful, the white is more of an ivory white. but it did serve to mix and tone down the blue when rubbed and blotted with a tissue.
Today I want to lay on some crumpled plastic to see if it breaks up the colors as it dries, as it would with acrylic paint. I'm hoping it makes a rocky looking texture.

I'm doing the 30 day chllenge so it seems a good time to experiment. Mostly I'm trying to see if these paints, although not created for fine art applications, and I have no idea how color fast they will prove to be - can be used in a painterly way. Most people are using these in art journals and in paper arts applications. They are fabulous for those. The Dylusion sprays are so bright and vivid, I'm finding for my taste, I'm having to dilute them down with water to get the intensity more measured. The Distress inks can give interesting effects with water sprays and drops Wear gloves when you work with the Dyluion inks. Found this out the hard way.
Here are some of the samples I'd done. Mostly you'll see I'm into landscapes right now. Meadows, waterfalls, mountains, water. The basics.

There are green colors here, such as Dirty Martini, Mowed Grass, Bundle of Spruce, Dark Olive. I need to make myself a new color chart with the new colors.


 I'm dabbing out some of the blue in the sky with a tissue. One of the distress staians is white, the Picket Fence. I have it in the dauber and used it randomly on the sky before spraying the blue. Not very successful, the white is more of an ivory white. but it did serve to mix and tone down the blue when rubbed and blotted with a tissue.
 Today I want to lay on some crumpled plastic to see if it breaks up the colors as it dries, as it would with acrylic paint. I'm hoping it makes a rocky looking texture.

Subscribe to:
Posts (Atom)

